WiFi Extender Setup Instructions
Manual Method
Here are the effective and straightforward steps that you need to follow to setup WiFi extender:
Reboot the Host Router
The very first thing you need to do is power cycle the host router so that it works properly during the WiFi extender setup. Below we give the easy steps to reboot the router perfectly:
- First, turn off the router by pressing the power button.
- Second, take two to five minutes until the device is powered off properly.
- Third, plug the power cable back into the working wall outlet.
- Fourth, turn on the router by pressing the power button.
In this way, you can restart your host router easily. Once the device is rebooted successfully, you can proceed further.
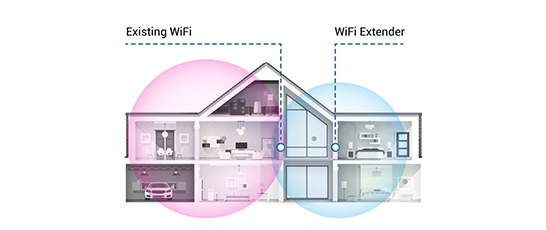
Step 1: Find the Optimal Location
- Find a location for your range extender where it can receive a strong signal from your existing WiFi router.
- This ensures that it can effectively extend the range of your wireless network.
- The location you will find for the extender should be dust-free.
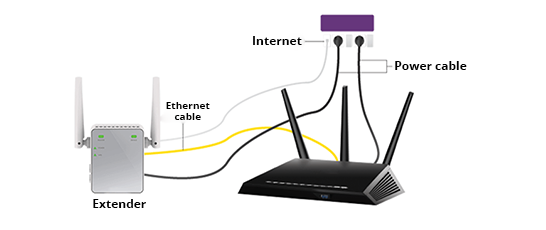
Step 2: Make a Connection
- Now, you need to make a strong connection between the router and the extender.
- To do this, take a LAN cable that is provided with an extender.
- Insert one end of the cable into the router LAN port and another into the extender Internet port.

Step 3: Power on Range Extender
- Supply fluctuation-free electricity to the range extender.
- Plug the extender into a working wall outlet.
- Press the power button to turn on the device.
- Wait for a couple of seconds until the device boots up.
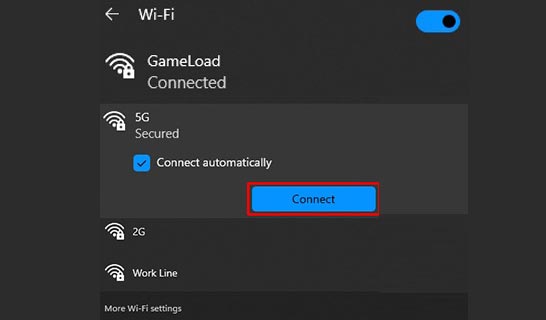
Step 4: Connect the Computer to Extender’s Network
You can follow the below mention ways in case you don’t know how to connect to Wifi extender to computer:
Wireless Connection: On your computer, go to the list of available WiFi networks and find the network name (SSID) of your range extender. It usually has a different name or includes the word "extender." Connect to this network.
Wired Connection: Take the new Ethernet cable; insert one end of the cable into the extender ETHERNET port, and another into the device you are using, i.e. a laptop or computer.
Step 5: Access the Extender Interface
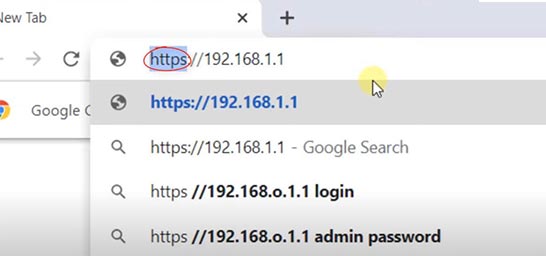
- Once connected to the range extender's network, open a web browser.
- Enter the default IP address of the device in the address bar.
Note: The default IP address can usually be found in the user manual or on the bottom of the range extender. Common IP addresses include 192.168.1.254 or 192.168.1.1.
- Press the Enter key to reach out to the login portal of the device.
Step 6: Log in to WiFi Range Extender
- After entering the IP address in the browser, you will be prompted to enter the login credentials.
Note: Again, refer to the user manual for the default username and password. Moreover, you can also try the “admin” for both username and password in most cases.
- Once, you put the username and credentials into the fields, click on the “Log In” button.
Step 7: Configure the Range Extender
- Now, you'll be presented with the setup wizard or configuration page.
- Follow the on-screen instructions to complete configuring the range extender.
- You may need to select your existing WiFi network and enter the password to establish the connection.
Step 8: Complete the Setup
- After selecting the extended network, save the settings and wait for some time.
- Once the settings become effective, place the extender in the dead zone area to get blazing-fast internet speed.
Tip: You can customize the settings also such as network name, security settings, or signal strength. You can adjust these settings according to your preferences.
Congratulations! Now, WiFi extender setup is successfully done, now you will enjoy the internet in every corner of your house without any issues.
Our Recent Posts
How to Link Satellite to Netgear Orbi Router wirelessly?
April 25, 2024There are three nodes in Netgear Orbi mesh system. There is one router and two satellites that provide rel...
How to Connect My Kindle with Linksys WiFi Extender?
April 24, 2024WiFi extenders can easily connect to any brand router in your home without using any wire or cable. Here w...
Can I Install Netgear Router with Hughes Satellite?
April 22, 2024Do you have the same query on your mind if you can install Netgear router with Hughes satellite, then this...
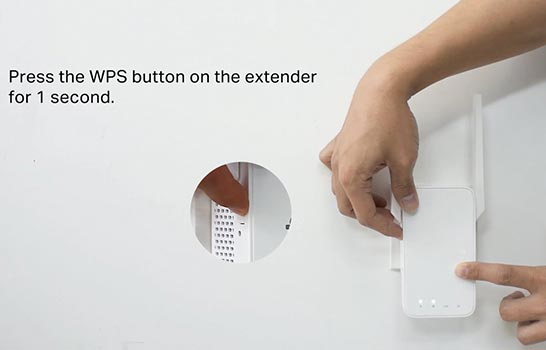
WiFi Extender Setup via WPS Button
If you are facing difficulties to perform the WiFi extender setup through the web interface, then you can use the WPS button method. Here are the steps:
- Initially, take the WiFi extender near the host router.
- Ensure that your devices are powered on.
- Now, find the WPS button on your extender as well as the host router.
- After that, press the WPS button on the extender and router.
- Wait for some time until the WiFi extender is set up.
Thus, in this way, you can configure your device via the WPS button easily.
Our Products

Linksys Velop Setup
Linksys velop mesh system comes with the three nodes. One of these nodes works as a WiFi router and other nodes works like extender to that router node. The velop node which will connect to the modem is called parent node and other ones called child nodes. The Linksys Velop setup is an easy and important process.

Linksys Extender Setup
Setting up a Linksys WiFi extender can be a little tricky sometimes. If you’re having trouble completing the Linksys WiFi extender setup and looking for a simple and easy guidance, then you have come to the right place. Here we will help you to get your extender up and running in no time. Keep reading to find more!
FAQs - WiFi extender setup
A WiFi extender extends your signal using a wired or wireless connection. A WiFi extender connects to your existing network and then creates a new Wi-Fi access point wherever you put the extender.
1. Plug the extender into a socket. 2. Connect extender and router. 3. Connect computer to extender’s network. 3. Launch web browser. 4. Insert IP address.
You can fix the extender not working issue by rebooting the extender.
Linksys, Netgear, TP-Link, and extenders of similar brands can be used to extend the home network range.