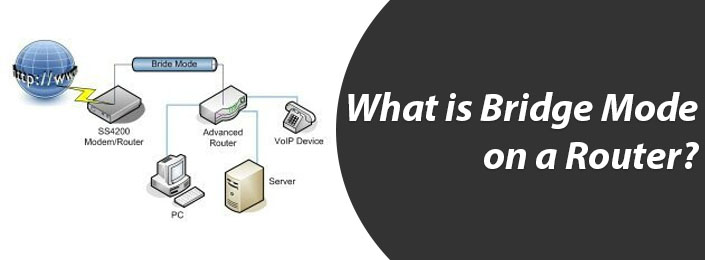
What is Bridge Mode on a Router?
Linksys Bridge mode is a default setting in a router, which turns off the router’s WiFi broadcast and make it into a bridge another WiFi router. This mode used to extend the WiFi signal in your house. Here in below written paragraphs, you will learn what is bridge mode on a router and how you can enable it. To enable the bridge mode, you will need an existing WiFi router, which will connect to another Linksys WiFi router and an active internet connection to access the Linksys router login.
How to Enable Bridge Mode on a Router?
Let’s take a look on some steps down here to enable the router bridge mode.

Connect Computer to Router
Step1: The first step is to connect your computer to a Linksys WiFi router.
Step2: Use the Ethernet cable to link the desktop to the router. There are four Etherent ports in the router, just connect end of cable to one of the ports and other end will connect to the computer.
Step3: After connecting, plug the power adaptor to an electrical socket and turn on the router.
Reach the Login Page
- To reach the interface login page, you have to open any web browser in your desktop. Then locate the address bar in it.
- Now, type in the Router’s IP address in the address bar that is 192.168.1.1 and hit the Enter key.
- After that, you will prompted to log in to the router. Just enter the router’s admin password and click on the Sign In option that is given under the blank.
Enable the Bridge Mode

- To enable the mode, you have to locate the router Settings and click on the Connectivity.
- Now, select the Internet Settings tab and click on the Edit option.
- Then set the Type of Internet Connection to Default Bridge Mode.
- Set the IP address configuration for your Linksys WiFi router.
There are two types of the IP address configuration for your router:
- Fill IPv4 address Automatically- To set the IP address automatically, you have to select “Obtain the IPv4 address automatically”. It will provide an IP for your Linksys router.
- Manually Type IP Address: If you want to fill the IPv4 address manually, then select “Specify an IPv4 Address” and add the IP address in the blanks.
- Then click the Apply button that is given on the lower- right corner of the page.
- Click Yes again on the Warning screen.
This warning will tell you that “using this mode will disable most of the apps available on your router and will prevent you from accessing the router using linksyssmartwifi. You can only access the router settings through its IP address.”
After clicking next, your router will set to the Bridge mode.
Connect Another Router
After setting the Linksys router to the bridge mode, you can connect the other router to it. To establish connection between two of them, you have to use network cable. Just connect the Modem/router to the Internet or WAN port of the Linksys router (the one you configured).
When the WiFi router detects the internet access, it will show you an Internet Restored prompt. Then just click Yes. After clicking it, you will be redirected to the Linksys smart WiFi sign in page.
- If you already have an account, then enter the details in email address and password fields and hit the Enter key.
- If you don’t have any account, click on the Create Account. Follow the step by step instructions which will help you to create and activate an account with Linksys smart WiFi.
Now, you have logged back into the interface of your router, you can secure the wireless network once again.
The Last Words
The bridge mode is a type of the default setting that is used to extend the network area. In this blog, you have explored what is bridge mode on a router and how you can enable the bridge mode on the Linksys smart WiFi router by simple steps. These steps includes connecting computer to the router system, log in to the router’s interface and connecting another router to the configured Linksys WiFi router. We hope you have successfully enabled bridge mode in your networking device.